Deep Cleaning Vinyl Records

There are many ways to clean vinyl records. No one way is the best but I feel like mine is the most thorough.

First I start by gluing the record. GLUING you ask? Won’t that ruin the record? If you use the wrong glue, yes. But if you use Titebond II, which you can find in any hardware store, you will see good results. The Titlebond II (don’t use Titebond I!) formula works by covering the grooves and hardening to a flexible vinyl negative. When you peel it off, it takes the junk off the surface and pulls out the junk deep inside the grooves. You will be very surprised at how older, seemingly scratchy records looks afterward.

Start with three things:
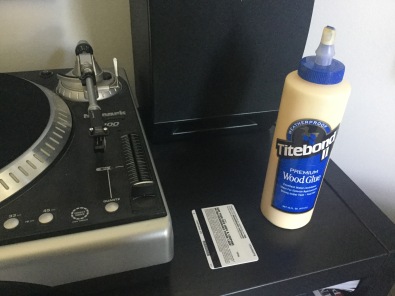
1. Titebond II glue
2. And old plastic card
3. Preferably a turntable but use a soft disposable towel as a second choice.

Later you will need a steamer and a wet vac with a modified wet vac tool (or a soft clean cloth).

File_003

While the turntable is running at 33.5RPM, apply the glue in a spiral by just moving from the label toward the outer edge. Be careful not to get glue on that label and don’t overrun your glue past the record’s edge. *If the glue seems a little thin, stop the record and add some more glue across the spiraled glue (see the third picture).

Hold the plastic card at a low angle (30 degrees or less) and smooth out the grooves. I usually press hard to make sure the glue is getting down in the grooves. Move the platter around with your thumb and go over your work to make sure you have uniform smoothness on the outer and inner edges because you don’t want strays of glue gobs.

Once the glue hardens, you can flip it over and glue the other side. Then when the record is done, you can peel the glue off to reveal your clean record! Some tips on drying: Place the record(s) near a fan to ensure faster drying. Do not set out in the sun! Note that the glue does give off a smell so do this in a room where you can close the door.

When both sides are finished, on the very edge of the record, agitate the glue with your fingernail and start peeling the glue back. Take your time because you don’t want any areas to tear off. They are very difficult to get off if that happens but what I have found easiest is to use masking take to pull up any stranded glue. An important note: if you had put on too thin of glue, you will have a mess on your hands as the glue has little elasticity. Be generous and refer back to the “*” above. The third picture shows a side where there was too little glue. I had to peel from the label side and ended up with a mess.

Now that we have a very clean copy of our record with years of dust and gunk removed, we will steam clean it to remove the static that formed when the vinyl/vinyl glue were separated. You will notice that your record now attracts a lot of dust. The steam cleaner will discharge that static and make your record optimally clean and ready to play/record. **Use distilled water in your steamer. Pre-heat for at least 15 minutes. This is important.

While the record is moving, run the steamer from the outer edge to the label and then back again. Move slowly but do not stop because you can damage the record. IMG_0823

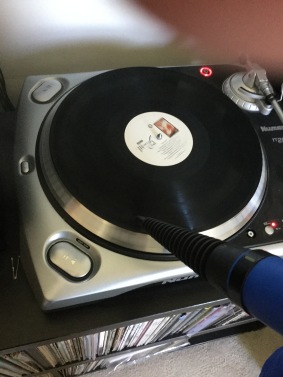
Now you will want to vacuum that water if possible or use a soft, clean cloth. I use a small wet vac. I took one of the wet vac tools and cut a slit on the bottom with a dremel. Then I hot-glued a piece of cloth (ripped off of an old RCA Discwasher brush). Then cut a slit in the cloth with an x-taco knife. Put a piece of tape on the end to cover the hole and presto! A very effective way to vacuum water off of the record, leaving no debris behind (see first picture). Much cheaper than a $500+ VPI record cleaning machine!

If you are using a cloth, wipe in the direction of the grooves, not against. If using an improvised wet vac tool, run perpendicular to the grooves and move the platter very slowly with your hand to ensure it pulls all of the water/debris out.

Congratulations! You now have a VERY clean record, perfect for archiving. I really need to upload a before/after clip so you can see how incredibly quiet the record is after this cleaning. In addition, if you hacked your wet vac tool, you can steam and vacuum new records to clean them up (new records have mold-release chemicals on them from the manufacturing) and get rid of the static.

Android Security

Android Security

Here are some tips for keeping your Android phone or tablet safe. As you may know, the Android phone platform is not very secure. It can be hacked/compromised through a variety of methods which I will get into through subsequent posts.

Is an iPhone safer? Out of the box, yes. But the advantage with the Android OS is that there are many security programs in the Google Play Store. There are many options not available in the walled garden we call the Apple iTunes App Store.  iPhones are still subject to hacking, fishing, wifi and http spoofing, etc.

Use a Virtual Private Network (VPN)

A Virtual Private Network (VPN) is a secure connection to a remote server that allows you to hide your IP address. This is beneficial for a variety of reasons. Region-restricted websites can be reached, your location and personal IP is masked from spies and trackers, bypass internet censorship for users outside of the United States (and U.S. residents who are on restricted WiFi access) and for downloading files over Bit Torrent.

Most VPN connections are made on a mobile platform through an app. It is usually easy to use – a simple click of a virtual button/switch and you are off the races. Make sure you add a bookmark in your browser to check your IP address to verify that you are really masking your IP address.

Most security-minded tech users are well aware of this first line of defense. There are many VPN options, most of which are pay-to-use, including Private Internet Access (PIA), KeepSolid, PureVPN, and IPVanish. I encourage you to look into all the options and consider that you do get what you pay for. Avoid “free” options as you are likely to be looking at a faulty service that may sell your data, show ads and create a false sense of security.  Personally, I use Private Internet Access VPN, which does not store logs of your use, works on your PC, Mac, iPhone, and Android platforms. There’s even a linux Ubuntu option. The service at the time of this post is $6.95/mo and $39.95/yr, which is divides out to $3.33/mo.

TOR

What is TOR?

I can’t explain it better than Wikipedia:

Tor is free software for enabling anonymous communication. The name is derived from an acronym for the original software project name “The Onion Router”.[8][9] Tor directs Internet traffic through a free, worldwide, volunteer network consisting of more than seven thousand relays[10] to conceal a user’s location and usage from anyone conducting network surveillance or traffic analysis. Using Tor makes it more difficult for Internet activity to be traced back to the user: this includes “visits to Web sites, online posts, instant messages, and other communication forms”.[11] Tor’s use is intended to protect the personal privacy of users, as well as their freedom and ability to conduct confidential communication by keeping their Internet activities from being monitored.

Tor is often used without VPN but I encourage you to use it with VPN. While Tor was seen as uncrackable, both governments and bad actors have discovered ways to unmask your Tor connection. This has scared many away from Tor, but rest assured that if you use an underlying VPN and aren’t up to devious/criminal behavior, you are likely safe to use Tor as a valuable privacy/security tool. If you are unmasked, the VPN will still show your VPN IP address. Here’s my humorous way of looking at it: Orbot is like pants, VPN is like underwear.

How do you use it with Android?

Using Tor is a two step app process. Download Orbot and Orfox from the Google Play Store. Both are free apps and were created by the Tor Project. Once downloaded, you will want to click on Orbot first which will create your Tor connection. Click start once in and the app will let you know if you are connected. This app will encrypt your internet traffic and will work with other Android apps, including Twitter, chat apps, web surfing, etc. Next you will want to open your Orfox app, which is a version of Firefox created by the Tor Project that will make sure  your web communications are routed through your Tor proxy connection. Use this rather than Chrome, Firefox and your default web browser for private browsing. It is generally frowned up to log into bank accounts and other accounts that can compromise your personal security. If you need to check your bank account, do so with your real IP before you log into VPN and Orbot.

Noscript and HTTPS Everywhere

Once you are in your Orfox browser, you will see links to “noscript” and “https everywhere.” You will want to install these Firefox add-ons. Orfox will by design block the installation and will ask you if you want to proceed. Noscript is open source software that blocks JavaScript, Java, Flash and other plugins from untrustworthy sources from running and hijacking your Android device. Https everywhere will attempt to force all website connections on Orfox to connect with https, which creates an encrypted connection between your android device and the destination.

D-Vasive Pro by John McAfee

John McAfee, the notorious creator of McAfee Anti-virus, legendary internet security pioneer and expert created this $5 app on the Google Play Store that blocks bad actors from accessing your bluetooth, wifi, camera, and microphone. If something attempts to open a connection to these things, the app will prompt you. If you want to use the wifi or camera, you can override the software as needed. Very valuable tool in a day when these things can be remotely activated to spy on you in real time! Highly recommended app.


Resurrected Mac Mini on a Budget

The older model Mac Mini circa 2005-2009 was a great PC alternative, measuring in at 2.0 × 6.5 × 6.5 inches instead of a huge beige tower. You can buy these old machines on ebay in the $50-$100 price range but their usability and expansion is limited by Apple. We will get around this!

The model I bought for $50 (that included shipping) was the Apple 2006 (model MA607LL/A) Mac Mini with a 1.66GHz [Intel Core Duo 2] processor,  CD-R/W,  160GB Hard drive, and a measly 1GB of RAM.

The RAM is expandable in this model to 2GB. There are two slots, so (2) 1GB RAM [DDR2 PC2 5300] modules could replace the (2) 512MB modules. RAM upgrade (both modules) for me cost a total of $6.40 shipped.

CPU being only 1.66GHz will need to be maxed out. The good news is that this machine’s CPU can be upgraded to a Intel Core 2 Duo T7200 mobile CPU 2.0 GHz. Total cost in my case, $7.65 with free shipping.

The Upgrade

To get the case apart, you will need to flip the unit over and take a screwdriver and gently pry along the seam until you can pop the lid off. I recommend watching an instructional video. It’s not user-friendly but it’s also not that difficult. The video linked was made by The 8-Bit Guy and he goes over how to take the case apart, replace the RAM and Hard Drive (jump to 1:30 if you are impatient).

For the upgrade, once the lid is removed, you will remove the air port connector, the ribbon cable and a controller cable. Remove some screws (this is all shown in the 8-Bit Guy’s video) and the CD-RW can be moved out of the way for your RAM, CPU and/or hard drive upgrade. In my case, I left the 160GB hard drive in because there’s plenty of room for my OS of choice, Ubuntu Linux 16.04.

RAM: once the CD/RW is out of the way, this is easy. Pull the metal tabs back slightly on each side and remove the top RAM module. Repeat for the bottom module. Reverse this process when installing the newer RAM. This part is done.

File_001.jpeg

For the CPU, turn that small screw you see in the picture on the CPU socket until you can free the CPU. Carefully place your 2.0GHz CPU in the socket and tighten the screw. Now apply a dab of thermal paste on the metal square on the CPU (as shown in the picture). Now you are done with the CPU!

File_000.jpeg

If you want to continue with the hard drive replacement, please refer back to the 8-Bit Guy’s video. Carefully reverse the disassembly process and your machine should be a happily upgrade Mac Mini!

Now for the OS. I was unable and unwilling to get a new Apple OSX operating system on this box. Unable because it’s a huge hassle and I believe you can only upgrade to Mountain Lion. Unwilling because the machine has limited specs and you are not going to get a good experience using this machine with OSX. Ubuntu Linux however will run VERY WELL! In fact, once I upgraded the OS to Ubuntu the machine ran quite nice and I’m able to do pretty much everything I normally do without any lock-ups, spinning wheels of death or slow downs. It’s not a rocket but it’s definitely usable and enjoyable.

To get Ubuntu Linux on your machine, visit the Ubuntu Desktop download section and download the 32-Bit ISO image. Now that you have the image, you will need to put it on a flash drive with your computer. In my case, I used a tool called Apple Pi Baker, which is also a great tool for flashing SD cards for Raspberry Pi. If you have windows or Linux and want to do this, I suggest looking for a good instruction video.

This is an important step: Installing the rEFIt boot menu for the Mac Mini. Go to the rEFIt Project page and download. Then install rEFIt. This will allow you to boot your the Ubuntu installation you flashed onto the flash drive.

Once you place the ISO onto the flash drive and install rEFIt, you will put it in your newly upgraded Mac Mini and hold the “Alt” key after you turn it on. Choose the Flash Drive and boot into Ubuntu and install. I chose to overwrite the entire drive since I do not plan on using this machine to run OSX. Once this process is complete, you will be enjoying a very inexpensive computer that has a low-power usage and fits in a very small space. In addition, Linux is cool and you can brag to your friends. 😉

File_003.jpeg

I am using a 32″ Samsung TV for the monitor. I needed to use a DVI to HDMI converter for the video signal. This is my setup!

File_002.jpeg